Building a redundant firewall with PfSense and CARP
Published on 2016-08-22This post is about building a redundant firewall with PfSense by utilizing CARP (Common Address Redundancy Protocol). PfSense is an open source firewall with enterprise features. PfSense is typically found at the edge of a network, but it can also be used to provide internal isolation. Both physical and virtual installations are supported.
Being based on FreeBSD, PfSense is known to be very stable. PfSense can do all kinds of awesome things with real easy configuration, like providing an OpenVPN server for remote login or site-to-site tunneling. I have been a PfSense user for years, for both personal and professional goals in multiple environments.
Introduction
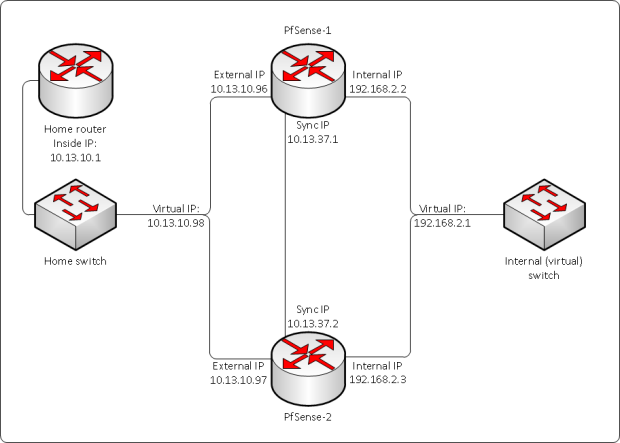
The example here will use VirtualBox on a Windows desktop. The starting point is having one PfSense VM already installed and configured to provide access to a LAN behind it. In this case, I have reincarnated the VM from another Conproly article. I will do a similar setup, providing access to an isolated network from my home network, through PfSense. The difference is this time around, we will have another PfSense to provide failover capabilities. The diagram for the scenario looks like this:
The diagram shows three different subnets:
- Home network (10.13.10.0/24)
- Internal network (192.168.2.0/24)
- Sync network (10.13.37.0/30)
The home network and the internal network are pretty self-explanatory, like in a regular firewall situation with an internal and an external network. The sync network is needed to provide synchronization between the two firewalls. The idea is that everything gets synchronized including configuration and firewall states, to provide a seamless failover. As you can notice in the diagram, besides their own IP addresses in each subnet, the firewalls also have a virtual IP address in both their internal and external networks. This is because in those networks an IP address is needed that has its own MAC address that can be shared between the two firewalls. Keep in mind that this setup is active-passive, so it has only one firewall active at a given moment.
While this lab setup is easily built inside a (home) network, the virtual IP or VIP makes it harder to place at the edge of a network. At home or in smaller organizations you typically have only one public IP address available. Because of the VIP and double firewall you would need at least three WAN IP’s so you would have to get a /29 public subnet assigned to you by your provider to make this work at the edge. The so-called First Hop Redundancy Protocol or FHRP that is being used here to achieve the redundancy is CARP. CARP is a BSD taste in FHRP, comparable to VRRP for example.
First firewall setup
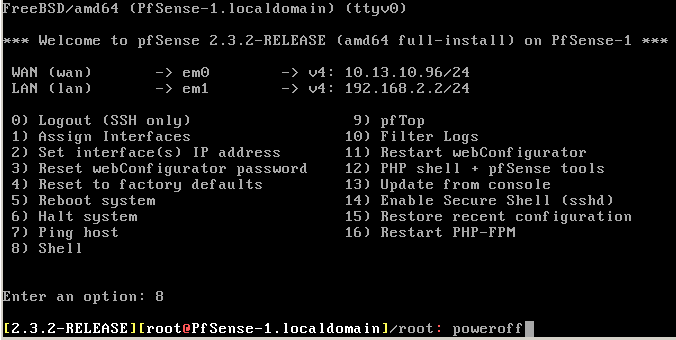
The first step when building this is to make sure you have a single PfSense set up and working properly. I have taken my reincarnated VM and adjusted the configuration to reflect the introduction story of this post. I’ve had to adjust some IP’s and the host name. After that, I gave PfSense-1 a shutdown. I’ve found that the easiest way to do this is in the console screen by going to the shell and typing “poweroff”:
After I powered it off, I had to do additional configuration to get my first firewall ready for CARP. In VirtualBox, I added another NIC, for a new internal network that I’ve called sync:
Pay special attention to the Promiscuous Mode: it is configured here as Allow All. The other options would be Deny or Allow VMs. This setting influences which traffic the NIC can see on the virtual switch. To make the failover features work, I’ve had to set the internal NIC’s to at least Allow VMs and the external NIC’s to Allow All. Since this is a lab and I don’t care, I’ve just put all the NIC’s on Allow All.
Second firewall setup
With the first firewall still powered off, but otherwise ready for action, I’ve used the Clone feature from VirtualBox. It asks for the name of the new VM, and has an option to provide all new NIC’s with new MAC addresses, which you definitely want to do as double MAC’s on a single broadcast domain will cause trouble:
The page after the screenshot asks if you want to create a linked clone, instead of creating an entire new virtual disk. PfSense has a low storage footprint, but why not, I’ve used a linked clone in this lab. With the first firewall still powered off, start your second PfSense and do the basic configuration:
- Edit the host name
- Edit the LAN and WAN IP’s
- Test it all
After this, you can configure the sync NIC. Go to the menu Interfaces -> (assign), click OPT1 and select the em2 NIC we’ve added with VirtualBox to assign by clicking the Add-button:
Sync network setup
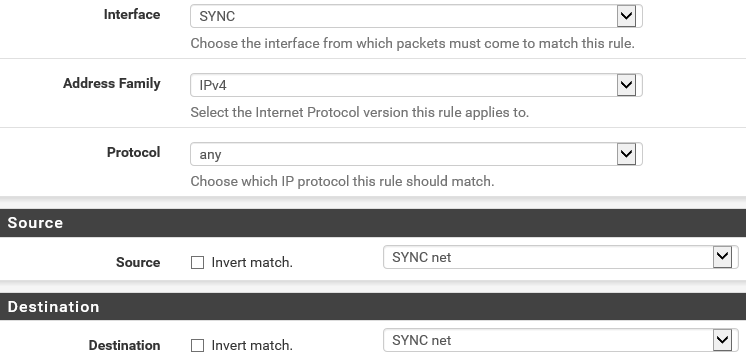
After adding the interface, configure the interface by giving it a name and the correct IP settings. I used a /30 subnet mask as two addresses is all you need in the sync network. Save the settings and boot the first PfSense again. Add the sync interface and do the interface configuration for the first firewall as well, then add a firewall rule for this interface on both VM’s, to allow all traffic on the sync network:
After adding a new firewall rule and saving it, you will see the rules screen again. This time, there will be a button saying Apply Changes, which you have to do to make the rule active. When you have added and applied the new rule on both firewalls, you can use the console to test if they can reach eachother with ping. If the test is successful, go on with the next step.
On the first PfSense, go to System -> High Avail. Sync and select Synchronize states, use the sync interface and give the IP from the second firewall, then hit save:
Now do this again for the second firewall, giving it the sync IP address of the first one of course. Save the settings on both. Now, again on the first PfSense, use the same menu to do the config sync instead of the state sync. It looks like this:
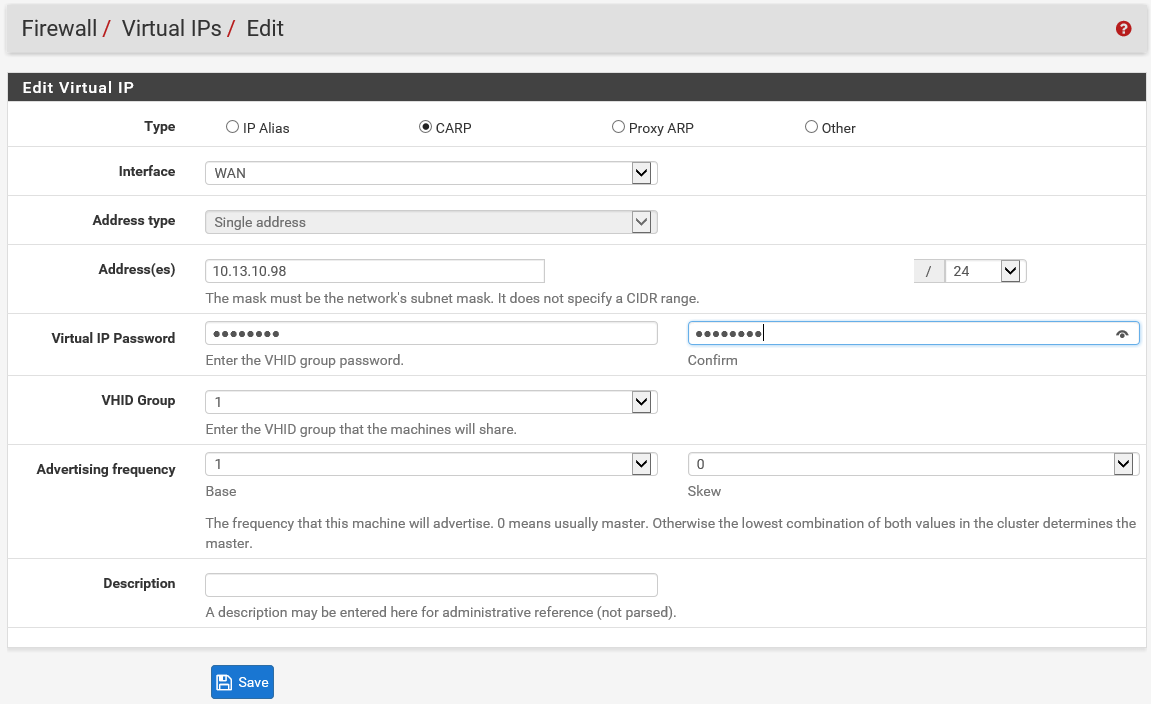
You should select all the check boxes (at the bottom of this page there is a convenient button for that) and then click save. These settings should only be applied on the first PfSense, otherwise you might mess up your synchronization and break the CARP setup. You have to use the admin user for this to work. Now go to Firewall -> Virtual IPs and click Add (WAN). Now you can add the virtual IP address that CARP is going to use on the outside NIC’s. Use the following settings:
Add the virtual IP address for CARP in the LAN network in the same way. Click Apply Changes after adding the second VIP. If you’ve completed this step, go to the same config on the second PfSense and check if the VIP’s have been added there as well. If they have, you know your synchronization is working well. You can also check the CARP status via the page Status -> CARP (failover). The first PfSense will show the status Master for both VIP’s, while the second PfSense will show the status Backup.
Now it’s time to test. I have a Windows VM inside the internal network that I use for this. Configure the gateway of the internal box to use the CARP VIP of the LAN, and then try pinging it. If that works, try to ping an IP on the internet, that should work as well. Since it’s a lab setup, I also like to add a firewall rule on the WAN interface that allows me to ping WAN to LAN as well, for testing purposes. I ping to the Windows VM I have inside the LAN. If you’ve placed the PfSense boxes at the edge of a network, you shouldn’t do it, but the rule looks like this:
The CARP setup should now be fully operational. I’ve had some strange behaviour in my lab because I had the promiscuous mode setting wrong the first time around. I’ve had to fiddle with some settings after that to get the setup to work. Just for completeness I’m going to give my settings that I have under Firewall -> NAT and then the outbound tab. It is set to automatic, which gives me the following two rules configured by default:
In the past, you’ve had to use manual entries to get this to work, but my lab works with the defaults on this version of PfSense. Another thing I’ve had to do is to temporarily disable CARP at the CARP status page, and then enable it again. When everything is reacting as it should, and you can reach both VIP’s and the outside world from the LAN network, the time has come to test the failover as that is the original purpose of this setup. I test like this: A device in the WAN (home) network is pinging continually to the Windows VM on the inside. The Windows VM on the inside is pinging continually to a Google DNS server, and to a box inside the WAN (home) network so issues outside my control don’t influence the results. The first PfSense box is the master. Power off the first VM, or disconnect the network adapters in VirtualBox. In some tests that I have done, I didn’t miss a single reply. In others, I missed up to two seconds.
Disclaimer: some of my tests reacted very strange, with a poweroff reacting different than a disconnected adapter, or getting replies from WAN to LAN but not the other way around. I’ve attributed this to strange VirtualBox behaviour, but it might be that I have missed an important setting somewhere. I have built the exact same setup with an older version of PfSense on a single VMware box in the past, and I didn’t encounter these strange symptoms back then. For now, I can live with this, because I was able to demonstrate the failover working. I might research this further some day, maybe building the setup on top of VMware again.
I’ve only seen the PfSense CARP setup in lab environments, never in production yet. I have one customer where PfSense is appropriate at the edge and I might make it redundant with CARP. I like the feature, but I miss some options like controlling the failback with a setting. The default is if the master node goes down, you will have a failover to the backup node. This might take up to 10 seconds in some environments, as I’ve understood it. If you fix the problems with the master node, you will immediately get a failback, causing a disruption again. It would be nice if you could keep the backup node as the master to prevent this. As always, thanks for reading my post, I hope you’ve enjoyed it. Please feel free to reach out on social media if you have any questions of comments.


